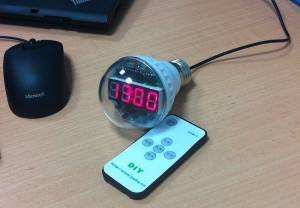
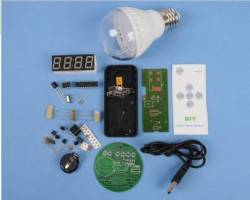
BCL-1 remote control clock
Ich habe mir 2014 bei ebay einen Bausatz „BCL-1 Remote Control Clock Suite DIY Kit“ für ca 7 € gekauft. Das ist eine Digitaluhr in einem Lampengehäuse, die Bedienung erfolgt über eine Fernbedienung.
Der Bausatz enthält alle Teile incl. Knopfzellen! Achtung: Es müssen auch mehrere SMD-Bauteile gelötet werden!
Kit Modell: BCL-1
Betriebsspannung: 5V (USB)
Fernbedienung Größe: 86*40*6 mm
Lampengehäuse Durchmesser: 60 mm
Funktionen:
- Alarm (7-22 Uhr Stundensignal, Stundensignal kann auch ausgeschaltet werden.)
- Fünf-Kanal-Wecker (kann eingeschaltet oder ausgeschaltet werden)
- Fehlerkorrektur (mit Software-Korrektur X Tagen Y Sekunden) die Korrekturfunktion über Fernbedienung wählen, setzen Sie die Parameter X und Y, Y positiv für X Tage plus Y Sekunden, Y für X Tage minus Y. negativ)
- Power-Off und Speicher (dank Clock-Chip + Back-up-Batterie, auch wenn die externe Stromversorgung ausfällt, läuft die Uhr weiter )
- genaue Zeit (Uhr-Chip-Quarz mit Fehler 5 PPM; außerdem Fehlerkorrekturverfahren)
Wie immer bei solchen Produkten aus China ist es nicht so einfach, Unterlagen etc. zu finden. Nach einiger Suche halfen folgende Links:
http://www.youtube.com/watch?v=Vgi-iqf2-N4 Uhr in Funktion
http://www.instructables.com/id/DIY-Your-BCL-1-Remote-Control-Clock-USB-Power-Supp/all/?lang=de Aufbauanleitung.
http://www.yqdiy.cn/a/diy/2011/0313/2874.html Aufbauanleitung für die Fernbedienung
http://www.nimseugjs.com/IC/All%20data%20modules/2973.zip enthält datasheet.pdf, eine (engl.) Anleitung für die Fernbedienung
http://uglyduck.ath.cx/PDF/misc/BCL-1-bulb-clock.pdf Anleitung in Chinesisch
http://www.ebay.co.uk/itm/BCL-1-Remote-Control-Clock-Suite-DIY-Kit-uk-/251566763914
Operating instructions
BCL-1Remote control clock specification
1>.BCL-1 remote control clock can realize those functions:
- Power lost memory
- Checking the time precisely, hourly chime
- Error correction
- Can turn off the digital display
- 5 channel alarm clock
2>.General description of DIY kits
- Kit model: BCL-1
- Package name: 4 -bit remote control clock
- PCB size :F57mm 1.0mm thick
- Work voltage: 5V (Powered by USB)
- lamp body size:F60mm
3>.Principle Description
The whole system is made up of MCU minimum system, infrared receiver circuit, display circuit, buzzer circuit, the clock chip and power supply.
- MCU minimum system: U1(STC11F04E),POR made up by C1 and R5, clock circuit made up by C2/C3/Y1
- Infrared receiver circuit: U3 is responsible to receive the signal that is sent by remote control. After amplification, the whole line is output from 1 pin and send to MCU to process.
- Display circuit:U4(74HC138D)3–8 decoder, Q1-Q4, R7-R14 and digital tube which has the same anode.
- Buzzer circuit: R6, Q5 and LS1,key tone of the clock, the sound of hourly chime, the bell of clock. Sound is output from P3.1 port of MCU and make a sound by Q5 driving LS1
- Clock chip:U2(DS1302), Y2, C5, C6 and BT1
- Power Supply: J1 connect power line and C4 smoothing.
4>.Operating instructions
A General function of keys:
the key in the center is main menu; The increase key and decrease key control „Shutdown“ and „shaking head“; The right and left key control “speed„ and “time“. When under the normal walking hour interface, enter the submenu of adjusting time.
- The submenu of adjusting time: the place where twinkles on digital tube is currently selected. By pressing the keys of “increase” “decrease” “left and„ “right“ to adjust the hour and minute. Then press the “wind„ key to save and exit. Then enter the submenu of setting alarm clock.
- Submenu of setting alarm clock: First, it is the choice of main switch of 5 channel alarm clock. The first bit displays C and two bits at the end when flash will display ON or OFF. It is switched by the keys of “increase” “decrease“. If you choose OFF, then press the key in the center to enter the submenu of error correction. If you choose ON, then press the key in the center to enter the submenu of setting of every channel. Take the first channel for example. Display C1 and two bits at the end when flash will display ON or OFF. The setting of ON and OFF is the same as above. If you choose OFF, then press the key in the center to enter the submenu of the setting about ON or OFF of the second channel. If you choose ON, then press the key in the center to enter the setting of hour and minute, the setting method is the same as adjusting time. After finish setting, press the key in the center to enter the setting of second channel, till finish the setting of the fifth channel. And then press the key in the center to enter the submenu of error correction
- Submenu of error correction: The first bit displays N and two bits at the end when flash will display ON (open correction) or OFF(close correction).It is switched by the keys of “increase” “decrease„. If you choose OFF, then press the key in the center to enter the submenu of normal walking hour interface. If you choose ON, then press the key in the center to enter the setting interface of correcting parameter. If the two bits at the end display 01 and flash, it represents one day. The number of days is among 1-999, you can switch by pressing the button of “increase“ and “decrease”. After you choose the day, then press the key in the center to enter the setting of second. Two bits at the end display 00 and flash, it represents 0 second. The number of days is among -50-50, you can switch by pressing the button of “increase and “decrease It means that X day minus Y second with negative sign. And it means that X day plus Y second without negative sign. At last, press the key in the center to enter the submenu of normal walking hour interface.
B The quick operating function of key
- Under the normal walking hour interface, press the key of “shutdown„ can close or open the display of digital tube.
- Under the normal walking hour interface, press the key of “shaking head“ can switch the interface between hour or minute interface and minute or second interface.
- Under the normal walking hour interface, press the key of “turn speed„ can choose ON or OFF of whole 5 channel alarm clock. After setting well, press the key in the center to enter the choice of ON or OFF about the function of hourly chime. Then press the key in the center and return to the normal walking hour interface
- Under the minute and second walking hour interface and display SEC. The second bit flashes, a few seconds later, the minute and second flash together. And according to the accurate time, press the key “time“ can let the second become zero. At the last, return to the minute or second walking hour interface and check whether the time is correct.

